Showing posts with label DIY. Show all posts

Wednesday, May 7, 2014

I'm Ba-aack!

Hey, friends!

I'm back finally!

 It's been a busy month, so blogging has taken a backseat unfortunately.
BUT! Here I am!

Here's a peek into what's been going on:


I made my first wedding cake! It was actually my first cake that I've made in about three years. I had to do a lot of googling to find tutorials on how to make bows and burlap flowers and to learn how to smooth buttercream, but by golly, I got it done! 

Props to my cousin for asking me to do this for her wedding when I had no experience.

She likes to live on the wild side....


We have a new kitten.

We may have acquired this kitten by me playing dirty using the super cute Sofia pout.

I'm a terrible wife, aren't I?


 Our great state of Arkansas was hit with some wicked storms. It was a somber week as the images of the aftermath flooded social media. The stories from survivors were so personal and it was absoutely heartbreaking. 
Fortunately all we had happen here at our house was a branch broke and almost fell on the car. 
Really, after knowing what could have happened, this was absolutely nothing.

Please keep Vilonia and Mayflower in your prayers, friends.


 Isaiah's birthday party was this weekend. He wanted a Dr. Who themed party and I happily obliged. 

I mean.. come on... 

It's Dr. Who.

I made chocolate dipped pretzels, bow ties made out of fruit roll ups, marshmallow adipose, and of course a Tardis cake.
It didn't turn out as well as I had hoped, so I won't share that picture. It would have turned out better, but I was caked out at that point.


 This is my gorgeous niece! She had a DEBS dance to go to. (It's like prom for Jr. High) She asked me to do her makeup for the dance and I was so happy to do it!


                                               Also.... She may take after me some....


I've entered a new business venture (yes, another one) and I've been making cake and cupcake orders for friends. This cake was made for a friend's daughter and I was fairly happy with how it turned out!


And I may have danced a little when the order was finally done...


This, friends, is my nephew. My sister's storage unit had been broken into, so we were cleaning up the mess when I persuaded him to joust with a Swiffer and tricycle. I even made him pose for 5 minutes while I got the picture just right.
I was laughing so hard the pictures were coming out blurry.

I'm such a good aunt...


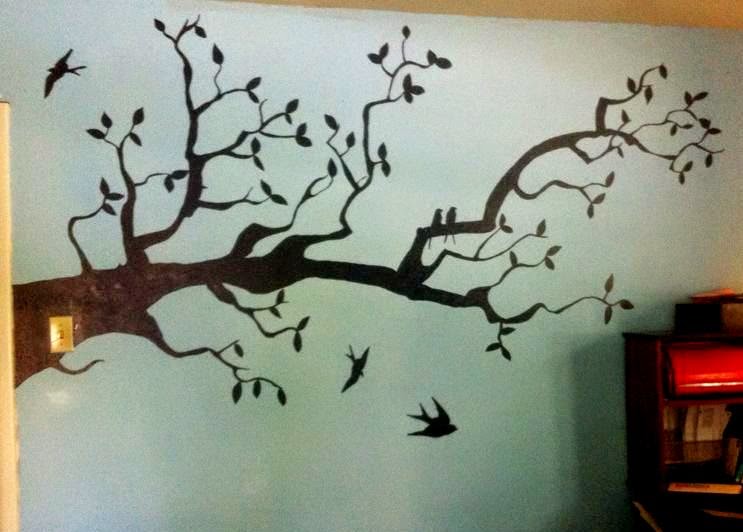
And finally, this was my "Josh-is-gone-for-two-weeks-so-I-need-to-keep-busy project". 

 I've seen other tutorials that used a projector, but since most people don't have those hanging around, I had to improvise.

This wall originally was chocolate brown, so I painted it the same sky blue as the rest of our bedroom.
Then, I found a picture of a branch silhouette that I liked to use as reference. I used a pencil to free hand the branch and I printed and cut out swallow silhouettes, placed them on the wall with tape, then traced around them as well. 
Then, used a watercolor brush to fill in the whole thing except for the thick part by the light switch (I actually got to use a normal paintbrush for that) with black paint. 
It took forever since I had to use such a small brush, but if I had used any bigger, it would have been sloppy.
  
I'm pretty stoked at how this turned out. 

Like, super happy. It made me smile when I woke up this morning.


So that's what this lady has been up to lately.
I would love to see some projects y'all have been working on!

Happy Wednesday,  y'all!

-Heather

Monday, March 24, 2014

Things I'm Obsessed With: Sewing Projects


First of all, whatcha think about the new blog look?!
I'm pretty stoked about it.

Now, back to business. I'm not quite sure what hit me this week, but I have been wanting to sew like crazy! Of course I took to Pinterest to locate all kinds of impossible-to-finish projects. Okay, well, not impossible, but time consuming and easy-to-mess up projects.

However, I plan on getting these done because, well, they're so practical and they're much-needed items around here.

First on my list is this wallet phone case. I've seen these sold, but there's something gratifying in making your own things. I have my material layed out for this project, I simply need to focus long enough to start and finish it.

 
Pin link here...
                                                       I mean, how cute is that?


Next is a pie carrier. Since I married a pie enthusiast, this is kind of essential to me. *sigh*

                                         
Pin link here...


Then we have a casserole carrier.
I mean, I'm Southern Baptist. I know casseroles and potlucks. Yet another essential.

Pin link here...


 Then we have possibly one of the most genius ideas ever. It's a Velcro bed skirt tutorial! It just Velcroes to your box spring mattress. I can't tell you how many times I went to put on my bed skirt and ended up an anxiety-ridden, sweaty mess after my mattress fell on me and I couldn't get out.

I. Could. Have. Died.

So this... this is life-saving, people!

Pin link here...


Yep... It's getting to be that time where my oldest is about to lose some baby teeth. I probably should hustle on this one then. I plan on making two, so I can just switch out pillows, therefore, have minimal chances of waking the child.

*sings*
I'm a geeeenius!

Pin link here...


Finally, we have a gorgeous purse/ bag/submarine (that last one is most likely what my husband would call it on account of it's size). I have a slight obsession with purses that I have managed to get under control throughout the years.
By 'under control', what I really mean is my husband asks me, " Do you really need another purse?" so often that it sucks any kind of fun out of buying one. Now I must resort to making them, because I haven't tired of hearing the same question asked about fabric yet.

So there...

Pin link here...
These projects should keep me busy for a couple of months (fewer if I had it my way).

Thanks for taking a peek at these fun projects!

Happy sewing!
-Heather

Tuesday, February 11, 2014

Year of Pinterest #3- Chalkboard Key Holder

First of all, this project was inspired by many pins, so I couldn't 'pin' down one particular pin. 

See what I did there?

Also, this project was done at night, so the lighting on the pictures is very poor. 

Sorry!

Anyways, we've had the same key holder since we got married. It's painted hunter green (I thought that color was amazing back then.) Well, now it really, really doesn't match our color scheme... Or possibly any color scheme anywhere. 

So I kind of threw together a Frankenstein project and it goes something like this:

First, I found an empty picture frame with cardboard backing ( it needs to have plenty of wood at the bottom to be able to insert eye hooks.) I removed the glass because I want to change the message on mine frequently, but you don't have to. My picture frame was already the color I wanted, so I didn't have to paint it. 

Then I found some eye hooks. Mine were already white, so I didn't have to paint. 

See, this project was meant to happen. 


Once you've removed the cardboard from the picture frame, pull out your trusty Duck brand chalkboard contact paper and cut out the size of your backing. 

At our Wal-Mart, it was with the shelf liners in the home goods department. 
I would show you the picture, but these pictures really sucked. 

After the contact paper is cut,peel the   backing off and place the contact paper on the cardboard. 


Knees! I didn't crop out my knees! 
*sigh* Oh well. 

Push the contact paper covered cardboard back into the frame, and secure it. 

Then have your lovely husband drill holes and place eye hooks on the bottom of your frame. 


Then....


You get this! Woo hoo!

Good luck!


Monday, February 10, 2014

Year of Pinterest #2 - Button Tree

About two years ago I found a pin on Pinterest of a pretty tree with button leaves. 

Unfortunately, there was no website associated with this pin, so it sat on one of my boards, longing to be created. 

Today I grew a pair and made my button tree. 

I'm pretty crafty, I must admit, however, as far as painting and drawing, I skipped out on that gene pool. 

My mom is an amazing artist, but my drawings look like a 1st grader's art piece at best. So, taking a stab at this free-handed was terrifying. (I don't like to fail.)

First, I grabbed a pencil, eraser, sharpie, and a canvass. 


I traced out my tree (very timidly and lightly so I could erase mistakes easily) then I traced the outline with my sharpie. 

Next, I painted the tree black. Pretty simple, right? 


Touch up sloppy outlines with your sharpie. 

Also, neat tip (this one is my own) use a double up cupcake liner to hold your paint. Small, contained, and easy clean up. Just toss it when you're finished. 


After your paint dries, take some buttons (I chose white, but you can use any color, and the more variety of shapes and shades, the neater) and practice your placement. This is a good time to recruit your husband and children. It's a lot neater when you can look at your finished product an know everyone had a hand in it. 


Once you're happy with your button placement, start the tedious gluing process. I just used Elmer's glue. 


Lay on a flat surface to dry for about an hour, then...

TA-DA!


You have your finished product!

I would love to see your end product if you tried this pin out! Hopefully your tree trunk will be less wibbly-wobbly than mine!


Saturday, February 8, 2014

The Year of Pinterest #1- Hiding that ugly modem and router

One of my biggest pet peeves in my living room was our ugly router and modem that sat atop our china cabinet. 

Here is this huge, beautiful cabinet filled with carnival glass, yet the only thing I  ever saw was the blinking lights of the router and modem. 

I had come across this tip on Pinterest yesterday and knew I had to give it a whirl. 


I couldn't bring myself to tear up any of the books we have, so I used dust covers instead. 
I have a tendency to trash book covers (I feel they take away from the actual book for some reason and at my house they get ripped quickly anyways) but I still had these two (because they were Josh's).

So on I slapped them...


Quick, painless, and no more blinky lights. In the future, I'll get prettier ones, but these will do for now. 
I placed more books on top of the cabinet so these two wouldn't be so lonely. 

There you have it... Camo success! 


Saturday, April 27, 2013

DIY: Good Deed of the Day Dry Erase Board

The other day Sawyer and I had a challenge to see who could do the most good deeds and make the most people happy. We of course both won because who loses when you're helping other people?

Well, that inspired me to come up with a homemade dry erase award to hang in the kids' room to remind them of the great things they did that day.

It was a Dollar Store project and set me back $3 per project.

I started out with a picture frame. Nothing fancy and both glass or plastic are perfectly fine.
Next, I got decorative printer paper that had a cute border.
I printed " Good Deed of the Day" on the paper using the landscape option.
Then, I simply replaced the store picture with my new personalized paper.

At the end of the day, sit with your kiddos and have them remember some good deeds they did that day. Write them on the glass with a dry erase marker.

I have to tell you that as I was making the list for Sawyer, he started wanting more deeds to put on the list, so he picked up the living room, put away his shoes, and picked the throw pillows up off the floor.
It seems that the encouragement is already starting to work. Good luck!

Happy crafting!
-Heather

I swear I could NOT get an un-blurry picture of this thing!

Sunday, November 4, 2012

Kitchen Re-Do!

I'm doing some catch up blogs, because, well, I haven't been good about keeping up with my blog. So, the next few blogs will be of events past, but they're still relevant! I promise!

When we bought out house 4 years ago, a lovely older lady had lived here for 16 years. And in that time, not much redecorating or updating had been done. Josh and I love to look at houses for what they could be and what character they hold. This house was no different.

There were three rooms in the house that have begged for a re-do since we did our first walk through- the third bedroom (it had paneling and blue carpet), the master bathroom (it has yellow tiles on every wall 3/4 of the way up), and the kitchen.

Oh, the kitchen. I spent every day for a week solid after we closed on the house scraping 3 layers of wallpaper off. Of course, then I had to mud, sand, and repaint. The colors I had picked for the kitchen were a group of yellows, but, to be honest, I hadn't honed in on my decorating skills yet, so it looked pretty bad. They had drywalled off the space between the top of the cabinets to the ceiling, so we knocked that out to add height and storage. Some of it has been finished, but Josh is a really busy man so two of the above cabinet spaces have still not been mudded or painted. However, The rest of the kitchen has been updated!

I'm a sucker for two magazines- Southern Living and Country Living. They always have some kind of decor that I'm crazy about. I saw an article where they had taken the cabinet doors off and it left this wonderful open space to display your dishes as well as knick-knacks. You all know my love of junkin', so I had plenty to fill the spaces! We had lots of left over paint, so this cost me absolutely NOTHING! I don't have any before pictures, but I do have now pictures! And here they are!


 I took off the cabinet doors and used primer white on all of the cabinets inside and out. If you look closely, you'll see a lot of my junkin' treasures and my jars of olive oils and flower petals (used for my perfumes and some cooking seasonings. We're using lavender on our Turkey this year.)
Here, I painted the walls and used the primer white again. I sewed together some burlap valances and hung my burlap tea holder. See that picture on the far right? My mom painted that. I need to do a post on her paintings alone. They're incredible. Also to the right is my infamous tea shelf. I typically have around 10+ different teas as well as my own mixtures on hand for different ailments.  We still have some wood paneling that needs to have something done with it (you can kind of see it in the bottom picture).

Since I had everything on hand, this re-do was completely free (other than the two days of my life I'll never get back). I want you to get creative when you get the urge to remodel.  Reuse and Repurpose! Not only is it good for the environment, but it's good for you wallet and creativity as well!

Happy re-dos!
-Heather